Tired of dealing with poor soil, soil borne diseases or hauling the hose across the yard to water the garden? We’ve found something new for you to try…. straw bale gardening. This method is probably not really new but it went mainstream with the publication of Joel Karsten book that has the improbable title of “Straw Bale Gardens: The Breakthrough Method for Growing Vegetables Anywhere, Earlier and With No Weeding”.
In this method you do not have to provide containers or soil; the straw bale is both. The first step is to choose a location for the straw bales. This may seem obvious but consider the weight of a sopping wet straw bale. There is also the near impossibility of moving a decomposing one if sometime during the season you decide that it isn’t getting enough sunlight or it is interfering with the mowing of the lawn. Some sources suggest placing them on a ground cloth to keep the weeds from growing up through the bales but we suspect that there aren’t many weeds that could make it up through a bale of straw. Initially, you will be watering and interacting with the project on a daily basis, so put it in a convenient place near a water supply. Place it in a sunny location unless you are planning on growing shade plants . Be advised that this is probably not a solution for growing perennials in sun or shade or in those spots where nothing will grow. A perennial that will not survive in a pot over the winter is probably going to freeze in a disintegrating straw bale, as well.
The bales will need to be “conditioned” before they are planted. This just means that a certain amount of decomposition must take place before the bale can serve as a growth medium. There are a number of ways of doing this. The simplest is just to keep the bales wet for a month or so prior to planting. Natural bacteria will start to break down the straw. A quicker method is to use a high nitrogen fertilizer. Karsten suggests the following schedule:
Days 1-3: Water the bales thoroughly and keep them damp. (Warm water will get things started faster.)
Days 4-6: Sprinkle each bale with a 1/2 cup of a high nitrogen fertilizer like ammonium nitrate (34-0-0) or ammonium sulfate per day, and water it well into the bales. If you’d wish you can substitute blood meal for the nitrate.
Days 7-9: Cut back to 1/4 cup of fertilizer per bale per day, and continue to water it in well.
Day 10: No more fertilizer, but continue to keep the bales damp.
Day 11: Stick your hand into the bale. If it has cooled down to less than your body heat, you may safely begin planting as soon as all danger of frost has passed.
The temperature inside the bales should reach at least 100 ° F. Hay can also be substituted for straw but be prepared to do some weeding as the seeds in the hay sprout.
Alter the bales are conditioned follow the planting schedule for whatever you want to plant. Lettuce can be put out early in May. If you want to use seeds layer the top of the bale with a seed starting medium of some sort. This keeps the seeds from drifting down into the straw and will help prevent damping off. If you are starting with plants, make a hole in the straw and add a little bit of potting soil. To keep bad bacteria and other contaminants from your straw bales avoid using garden soil for this purpose. Plant as you would in the ground. About 6 lettuce plants are appropriate per each straw bale.
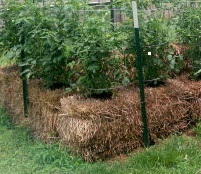
Tomatoes should be planted at the end of May, two or three to a bale. You might get away with no staking with determinant tomatoes, allowing them to cascade over the side of the bale, but indeterminate ones will have to be staked. Four pepper or eggplants pepper plants can be fitted on to a straw bale. Planting in straw is a classic way to get clean potatoes or deal with potato scab. This would also be a cute way to plant annuals. I see no reason why you couldn’t plant your vegetable on top and having some small annuals growing out the side of the bales.
Once the bales are planted they will need careful watering until the straw begins to deteriorate to the point that it will hold more water. Never let the bales dry out. A soaker hose over the tops of the bales eliminates the need to stand there and water with a hose or carry water. Fertilize as needed. Expect earlier vegetables and flowers with this system as roots will be kept warmer and grow faster in the deteriorating straw than they would in the soil.